Texture
Overview of Texture
Texture is one of the most commonly used resources in 3D rendering. When we color a model, we need to set a color value for each fragment. In addition to setting the color value directly, we can also choose to read the texel from the texture to color it, thus achieving a richer artistic effect.
Texture Type
| Type | Description |
|---|---|
| 2D Texture | Most commonly used art resources, using two-dimensional UV coordinates for sampling |
| Cross Cube Texture | 6 2D textures form a cross cube texture, which can be used to implement skybox, environment reflection, and other effects |
| LDR Cube Texture | 6 LDR textures form a panoramic sky map, which can be used to implement skybox, environment reflection, and other effects |
| HDR Texture | Supports sampling textures in RGBE format |
| HDR Cube Texture | 6 HDR textures form a panoramic sky map, which can be used to implement skybox, environment reflection, and other effects |
Create Texture
1. Create 2D Texture Manually
By creating a texture instance, we can manually create a texture object, and then load the corresponding image resource through load:
2D Texturesupports web common image formats,jpg/png/webp;HDR Texturesupports loading.hdrimages inRGBEformat;
import { BitmapTexture2D } from '@orillusion/core';
// Create 2D Texture
let texture = new BitmapTexture2D();
// Load texture resource
texture.load('path/to/image.png');

// Create HDR Texture
let hdrTexture = new HDRTexture();
hdrTexture = await hdrTexture.load('path/to/image.hdr');2. Load Texture Through Resource Manager
Besides manually creating texture objects, we recommend loading images through the resource manager to automatically create the corresponding texture maps:
import { Engine3D } from '@orillusion/core';
// 2D Texture
let texture = Engine3D.res.loadTexture('path/to/image.png');
// HDR Texture
let hdrTexture = Engine3D.res.loadHDRTexture('path/to/image.hdr');
// Cross Texture Cube
let texture = Engine3D.res.loadTextureCube('path/to/sky.png');
// LDR Texture Cube
let HDRTextureCube = Engine3D.res.loadLDRTextureCube('path/to/sky.png');
// HDR Texture Cube
let HDRTextureCube = Engine3D.res.loadHDRTextureCube('path/to/sky.hdr');3. Manually Fill Color Data
The texture actually corresponds to the color value of each pixel, that is, the RGBA channel. We can manually create Uint8Array to fill in the specific numerical values of the rgba color channel, and then create the texture through Uint8ArrayTexture class:
// Parameters of the picture
let w = 32;
let h = 32;
let r = 255;
let g = 0;
let b = 0;
let a = 255;
// Create raw Uint8Array
let textureData = new Uint8Array(w * h * 4);
// Fill rgba values
for (let i = 0; i < w; i++) {
  for (let j = 0; j < h; j++) {
      let pixelIndex = j * w + i;
      textureData[pixelIndex * 4 + 0] = r;
      textureData[pixelIndex * 4 + 1] = g;
      textureData[pixelIndex * 4 + 2] = b;
      textureData[pixelIndex * 4 + 3] = a;
    }
  }
// Create texture through rawData
let texture = new Uint8ArrayTexture();
texture.create(16, 16, textureData, true);Load Texture
2D Texture
We can directly assign the texture to the corresponding property of the material, such as the basic texture (baseMap):
let floorMat = new LitMaterial();
let texture = await Engine3D.res.loadTexture('path/to/image.png');
floorMat.baseMap = texture;import { Engine3D, Vector3, Scene3D, Object3D, Camera3D, AtmosphericComponent, View3D, UnLitMaterial, MeshRenderer, HoverCameraController, PlaneGeometry, DirectLight, Color } from '@orillusion/core';
await Engine3D.init();
let scene = new Scene3D();
let camera = new Object3D();
scene.addChild(camera);
let mainCamera = camera.addComponent(Camera3D);
mainCamera.perspective(60, Engine3D.aspect, 0.1, 10000.0);
let hc = camera.addComponent(HoverCameraController);
hc.setCamera(0, 0, 2);
// create a unlit material
let mat = new UnLitMaterial();
let texture = await Engine3D.res.loadTexture('https://cdn.orillusion.com/gltfs/cube/material_02.png');
mat.baseMap = texture;
// add a plane to display the image
let planeObj = new Object3D();
let mr = planeObj.addComponent(MeshRenderer);
mr.geometry = new PlaneGeometry(2, 2, 10, 10, Vector3.Z_AXIS);
mr.material = mat;
scene.addChild(planeObj);
// add a light
let lightObj = new Object3D();
lightObj.rotationX = -45;
let light = lightObj.addComponent(DirectLight);
light.lightColor = new Color(1.0, 1.0, 1.0, 1.0);
light.intensity = 10;
scene.addChild(lightObj);
// add an Atmospheric sky enviroment
scene.addComponent(AtmosphericComponent).sunY = 0.6;
// create a view with target scene and camera
let view = new View3D();
view.scene = scene;
view.camera = mainCamera;
// start render
Engine3D.startRenderView(view);Cross Texture Cube
Cross Texture Cube has 6 faces, that is, 6 2D textures are arranged in the order of the following figure to form a cube box:
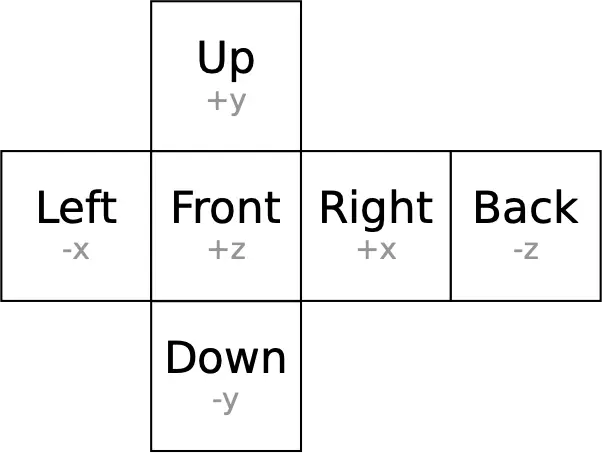
Cross Texture Cube can be used to implement skybox, environment reflection, and other effects. We recommend loading 1 complete cross cube texture directly through Res and assigning it to `scene.envMap
// Load a cross texture cube
let textureCube = Engine3D.res.loadTextureCube('path/to/crossSky.png');
// Set skybox
scene.envMap = textureCube;Also, we can manually load 6 independent faces of the cube texture through BitmapTextureCube:
let textureCube = new BitmapTextureCube();
// Load 6 independent faces
await textureCube.load([
    'x Right',
    '-x Left',
    'y Up',
    '-y Down',
    'z Front',
    '-z Back'
]);import { Camera3D, Engine3D, View3D, HoverCameraController, Object3D, Scene3D, BitmapTextureCube, SkyRenderer } from '@orillusion/core';
await Engine3D.init();
let scene = new Scene3D();
let camera = new Object3D();
scene.addChild(camera);
let mainCamera = camera.addComponent(Camera3D);
mainCamera.perspective(60, Engine3D.aspect, 1, 2000.0);
let ctrl = camera.addComponent(HoverCameraController);
ctrl.setCamera(180, 0, 10);
let evnMap = new BitmapTextureCube();
let urls: string[] = [];
urls.push('https://cdn.orillusion.com/textures/cubemap/skybox_nx.png');
urls.push('https://cdn.orillusion.com/textures/cubemap/skybox_px.png');
urls.push('https://cdn.orillusion.com/textures/cubemap/skybox_py.png');
urls.push('https://cdn.orillusion.com/textures/cubemap/skybox_ny.png');
urls.push('https://cdn.orillusion.com/textures/cubemap/skybox_nz.png');
urls.push('https://cdn.orillusion.com/textures/cubemap/skybox_pz.png');
await evnMap.load(urls);
let sky = scene.addComponent(SkyRenderer);
sky.map = evnMap;
// create a view with target scene and camera
let view = new View3D();
view.scene = scene;
view.camera = mainCamera;
// start render
Engine3D.startRenderView(view);Panoramic Texture Cube
By loading a panoramic texture cube using Res, we can also load a panoramic (equirectangular) type of texture. Both common RGBA type images and hdr images in RGBE format are supported:
// Load LDR panoramic texture cube
let ldrTextureCube = await Engine3D.res.loadLDRTextureCube('path/to/sky.png');
// Load HDR panoramic texture cube
let hdrTextureCube = await Engine3D.res.loadHDRTextureCube('path/to/sky.hdr');import { Camera3D, Engine3D, View3D, HoverCameraController, Object3D, Scene3D, SkyRenderer } from '@orillusion/core';
await Engine3D.init();
let scene = new Scene3D();
let sky = scene.addComponent(SkyRenderer);
let hdrTextureCube = await Engine3D.res.loadHDRTextureCube('https://cdn.orillusion.com/hdri/T_Panorama05_HDRI.HDR');
sky.map = hdrTextureCube;
let camera = new Object3D();
scene.addChild(camera);
let mainCamera = camera.addComponent(Camera3D);
mainCamera.perspective(60, Engine3D.aspect, 1, 2000.0);
let ctrl = camera.addComponent(HoverCameraController);
ctrl.setCamera(180, 0, 10);
let view = new View3D();
view.scene = scene;
view.camera = mainCamera;
Engine3D.startRenderView(view);Texture Settings
1. Texture Repeat
The default range of texture sampling is [0,1], that is, the texture is tiled to the entire plane. We can manually change the coordinate range of texture repetition by setting the uvTransform_1 property of the material:
let mat = new LitMaterial();
// Make the texture repeat 2 times in the horizontal and vertical directions
mat.uvTransform_1 = new Vector4(0,0,2,2);
mat.baseMap = new BitmapTexture2D();When the uvtransform_1 of the texture exceeds the range of [0,1], we can control the way of repetition in the horizontal and vertical directions by setting the addressModeU and addressModeV properties of the texture, for example:
let texture = new BitmapTexture2D();
// Horizontal direction, default repeat mode
texture.addressModeU = GPUAddressMode.repeat;
// Vertical direction, default repeat mode
texture.addressModeV = GPUAddressMode.repeat;WebGPU currently supports the following repeat modes:
- Repeat: default mode, the range beyond is resampled from
[0,1].
- Mirror_repeat: beyond the range, after the mirror flip, resampling starts from
[0,1].
- Clamp_to_edge: beyond the range, sample the edge pixel color of the texture.
import { Engine3D, Vector3, Scene3D, Object3D, Camera3D, AtmosphericComponent, View3D, UnLitMaterial, MeshRenderer, HoverCameraController, PlaneGeometry, Vector4, GPUAddressMode, DirectLight, Color } from '@orillusion/core';

await Engine3D.init();
let scene = new Scene3D();
let camera = new Object3D();
scene.addChild(camera);
let mainCamera = camera.addComponent(Camera3D);
mainCamera.perspective(60, Engine3D.aspect, 0.1, 10000.0);
let hc = camera.addComponent(HoverCameraController);
hc.setCamera(0, 0, 2);

// add a dir light
let lightObj = new Object3D();
lightObj.rotationX = -45;
let light = lightObj.addComponent(DirectLight);
light.lightColor = new Color(1.0, 1.0, 1.0, 1.0);
light.intensity = 10;
scene.addChild(lightObj);

// add an Atmospheric sky enviroment
scene.addComponent(AtmosphericComponent).sunY = 0.6;
// create a view with target scene and camera
let view = new View3D();
view.scene = scene;
view.camera = mainCamera;
// start render
Engine3D.startRenderView(view);

let texture = await Engine3D.res.loadTexture('https://cdn.orillusion.com/images/webgpu.webp');
// texture.addressModeU = GPUAddressMode.repeat;
// texture.addressModeV = GPUAddressMode.repeat;
let mat = new UnLitMaterial();
mat.setUniformVector4('transformUV1', new Vector4(0, 0, 2, 2));
mat.baseMap = texture;

let planeObj = new Object3D();
let mr = planeObj.addComponent(MeshRenderer);
mr.geometry = new PlaneGeometry(2, 2, 10, 10, Vector3.Z_AXIS);
mr.material = mat;
scene.addChild(planeObj);

let select = document.createElement('select');
select.innerHTML = `
    <option value="repeat">Repeat</option>
    <option value="mirror_repeat">Mirror-Repeat</option>
    <option value="clamp_to_edge">Clamp-to-Edge</option>
    `;
select.setAttribute('style', 'position:fixed;right:5px;top:5px');
document.body.appendChild(select);

select.addEventListener('change', () => {
    texture.addressModeU = GPUAddressMode[select.value];
    texture.addressModeV = GPUAddressMode[select.value];
});2. Sampling Filter Mode
Generally speaking, pixels and screen pixels may not correspond exactly, which requires the GPU to scale the pixel size. But different scaling modes can have a certain impact on the final pixel color. We can control the filtering mode used when GPU zooms in (Mag) and out (Min) pixels by setting the magFilter and minFilter attributes of the texture.
let texture = new BitmapTexture2D();
// Magnification mode, default linear mode
texture.magFilter = 'linear';
// Minification mode, default linear mode
texture.minFilter = 'linear';WebGPU currently supports linear sampling and nearest point sampling modes.
Generally speaking, the linear mode has a smoother pixel edge, which is suitable for complex graphic transitions; the nearest mode has a sharper pixel edge, which is suitable for textures with clear color distribution and obvious edges. We can see the effect of different sampling modes on the texture display through the following example:
import { Engine3D, Vector3, Scene3D, Object3D, Camera3D, AtmosphericComponent, View3D, UnLitMaterial, MeshRenderer, HoverCameraController, PlaneGeometry, BitmapTexture2D, DirectLight, Color } from '@orillusion/core';

await Engine3D.init();
let scene = new Scene3D();
let camera = new Object3D();
scene.addChild(camera);
let mainCamera = camera.addComponent(Camera3D);
mainCamera.perspective(60, Engine3D.aspect, 0.1, 10000.0);
let hc = camera.addComponent(HoverCameraController);
hc.setCamera(0, 0, 0.2);

// add a dir light
let lightObj = new Object3D();
lightObj.rotationX = -45;
let light = lightObj.addComponent(DirectLight);
light.lightColor = new Color(1.0, 1.0, 1.0, 1.0);
light.intensity = 10;
scene.addChild(lightObj);

// add an Atmospheric sky enviroment
scene.addComponent(AtmosphericComponent).sunY = 0.6;
// create a view with target scene and camera
let view = new View3D();
view.scene = scene;
view.camera = mainCamera;
// start render
Engine3D.startRenderView(view);

let texture = new BitmapTexture2D();
await texture.load('https://cdn.orillusion.com/gltfs/cube/material_02.png');
texture.magFilter = 'linear';
texture.minFilter = 'linear';

let mat = new UnLitMaterial();
mat.baseMap = texture;
let planeObj = new Object3D();
let mr = planeObj.addComponent(MeshRenderer);
mr.geometry = new PlaneGeometry(2, 2, 10, 10, Vector3.Z_AXIS);
mr.material = mat;
scene.addChild(planeObj);

let select = document.createElement('select');
select.innerHTML = `
    <option value="linear">Linear</option>
    <option value="nearest">Nearest</option>
    `;
select.setAttribute('style', 'position:fixed;right:5px;top:5px');
document.body.appendChild(select);

select.addEventListener('change', () => {
    texture.magFilter = select.value;
    texture.minFilter = select.value;
});3. Mipmap
In 3D world, different objects and cameras have different distances, the corresponding texture can be large or small. If the same resolution texture is used, for distant objects, a small part of the pixel color needs to be picked up from the high resolution original image, which not only wastes GPU performance, but also causes a sense of unreality or a large number of moire patterns due to pixel distortion.Orillusion uses the concept of mipmap to solve this problem. Simply put, it is a high resolution graphic that is automatically scaled into a series of different resolution textures. According to the distance between the texture and the observer, different resolution textures are used. Distant objects use low resolution textures, which are more natural in resolution, and can also effectively save GPU performance.
We can enable or disable it through useMipmap, which is enabled by default:
let texture = new BitmapTexture2D();
// True by default
texture.useMipmap = true;import { Engine3D, Scene3D, Object3D, Camera3D, AtmosphericComponent, View3D, UnLitMaterial, MeshRenderer, PlaneGeometry, BitmapTexture2D, Vector4, OrbitController, DirectLight, Color } from '@orillusion/core';
await Engine3D.init();
let scene = new Scene3D();
let camera = new Object3D();
camera.y = 10;
camera.z = 30;
scene.addChild(camera);
let mainCamera = camera.addComponent(Camera3D);
mainCamera.perspective(60, Engine3D.aspect, 0.1, 10000.0);
let oribit = camera.addComponent(OrbitController);
oribit.autoRotate = true;
// add a dir light
let lightObj = new Object3D();
lightObj.rotationX = -45;
let light = lightObj.addComponent(DirectLight);
light.lightColor = new Color(1.0, 1.0, 1.0, 1.0);
light.intensity = 1;
scene.addChild(lightObj);
// add an Atmospheric sky enviroment
scene.addComponent(AtmosphericComponent).sunY = 0.6;
// create a view with target scene and camera
let view = new View3D();
view.scene = scene;
view.camera = mainCamera;
// start render
Engine3D.startRenderView(view);
const imageCanvas = document.createElement('canvas');
const context = imageCanvas.getContext('2d') as CanvasRenderingContext2D;
{
imageCanvas.width = imageCanvas.height = 128;
context.fillStyle = '#444';
context.fillRect(0, 0, 128, 128);
context.fillStyle = '#fff';
context.fillRect(0, 0, 64, 64);
context.fillRect(64, 64, 64, 64);
}
const image = imageCanvas.toDataURL('image/png');
let texture = new BitmapTexture2D();
texture.useMipmap = true;
await texture.load(image);
let mat = new UnLitMaterial();
mat.baseMap = texture;
mat.setUniformVector4('transformUV1', new Vector4(0, 0, 100, 100));
let plane = new PlaneGeometry(1000, 1000, 10, 10);
let planeObj = new Object3D();
let mr = planeObj.addComponent(MeshRenderer);
mr.geometry = plane;
mr.material = mat;
scene.addChild(planeObj);
let select = document.createElement('select');
select.innerHTML = `
<option value="true">Use MipMap</option>
<option value="false">No MipMap</option>
`;
select.setAttribute('style', 'position:fixed;right:5px;top:5px');
document.body.appendChild(select);
select.addEventListener('change', () => {
texture.useMipmap = select.value === 'true';
});