Camera
Camera is a tool for users to display or capture the virtual world, just like the eyes that observe things in the real world. All the cool images need to be rendered through the camera. At least one camera must be present in each scene to view the objects in the scene. Orillusion has already encapsulated the camera types and controllers commonly used, and users can also extend the function of the camera by custom components.
Basic Usage
import { Object3D, Scene3D, Camera3D } from '@orillusion/core'
// Initialize a scene
let scene = new Scene3D();
// Initialize a camera node
let cameraObj = new Object3D();
// Add a camera component to the node
let camera = cameraObj.addComponent(Camera3D);
// Add the camera node to scene
scene.addChild(cameraObj);

// Create 3D view
let view = new View3D();
// Fill the scene to the 3D view
view.scene = scene;
// Fill the camera to the 3D view
view.camera = camera;
// Start rendering
Engine3D.startRenderView(view);If there are multiple cameras in the scene, you can manually switch the target camera through view.camera:
// If multiple cameras exist in the scene
let cameraObj1 = new Object3D();
let camera1 = cameraObj.addComponent(Camera3D);
let cameraObj2 = new Object3D();
let camera2 = cameraObj.addComponent(Camera3D);

// Create 3D view
let view = new View3D();
// Set the rendering scene
view.scene = scene;
// camera1 Set camera1
view.camera = camera1;
...
// Switch to use camera2 for rendering
view.camera = camera2;Camera Position
There are three ways to change the camera position:
- By
TransFormtransformation: The position and direction angle of the camera can be manually set through the transForm property of the camera nodeObject3D:
// Create a node
let cameraObj = new Object3D();
// Add a camera component to the node
let camera = cameraObj.addComponent(Camera3D);
// Set the Position or Rotation of the Object3D
cameraObj.x = 10;
cameraObj.rotateX = 90;
...- By
lookAtfunction of the component: The lookAt function of the camera component can set the position of the cameraObject3Dand the position of the target to be observed at the same time:
// Create a node
let cameraObj = new Object3D();
// Add a camera component to the node
let camera = cameraObj.addComponent(Camera3D);
// Use the lookAt function of the Camera3D component to change the position and direction angle of the Object3D
camera.lookAt(new Vector3(0,0,10), new Vector3(0,0,0), new Vector3(0,0,1));| Parameter | Type | Description | Example |
|---|---|---|---|
| pos | Vector3 | The position of the object itself (global) | Vector3(0, 0, 0) |
| target | Vector3 | The position of the target (global) | Vector3(0, 1, 0) |
| up | Vector3 | The coordinate axis of the direction the camera is facing up | Vector3(0, 1, 0) |
- Camera Controller: Several common controller components are built in the engine, which can automatically adjust the position properties of the camera according to the user's input interaction.
Camera Type
The engine mainly supports orthographic cameras and perspective cameras for developers to use currently.
Orthographic Projection
In orthographic camera mode, the size of the object does not change regardless of how far the object is from the camera. We usually use orthographic cameras in 2D drawing, and set the z coordinate to 0.0 in our geometric graphics. But the z axis can be extended to any length we want. Using an orthographic camera to project the display object, the result is scaled proportionally without distortion.
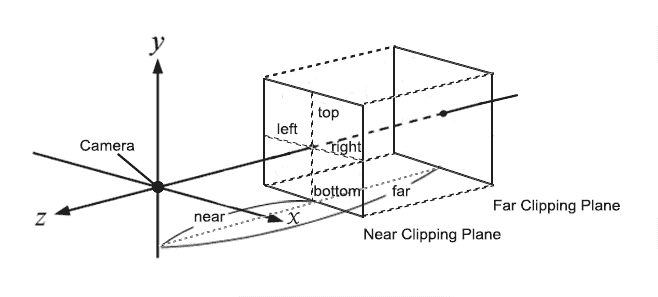
Use camera.orthoOffCenter API to set an orthographic camera with custom size:
| Parameter | Type | Description | Example |
|---|---|---|---|
| left | number | The minimum value of the x-axis of the viewing frustum | -window.innerWidth / 2 |
| right | number | The maximum value of the x-axis of the viewing frustum | window.innerWidth / 2 |
| bottom | number | The minimum value of the y-axis of the viewing frustum | -window.innerHeight / 2 |
| top | number | The maximum value of the y-axis of the viewing frustum | window.innerHeight / 2 |
| near | number | The z value of the near clipping plane of the viewing frustum | 1 |
| far | number | The z value of the far clipping plane of the viewing frustum | 5000 |
In general, we can quickly set up an orthographic space centered on the camera target, with frustumSize as the height and frustumSize as the depth using camera.ortho. It automatically calculates left and right based on the screen ratio and automatically computes the frustum near and far values relative to the camera target.
| Parameter | Type | Description | Example |
|---|---|---|---|
| frustumSize | number | Height of the frustum | 100 |
| frustumDepth | number | Depth of the frustum | 100 |
Perspective Projection
Perspective projection will use perspective division to shorten and shrink objects that are far away from the observer. Objects with the same logical size appear larger in the front position than in the back position in the visible area, which can achieve the observation effect close to the human eye. It is the most commonly used projection mode in 3D scenes.
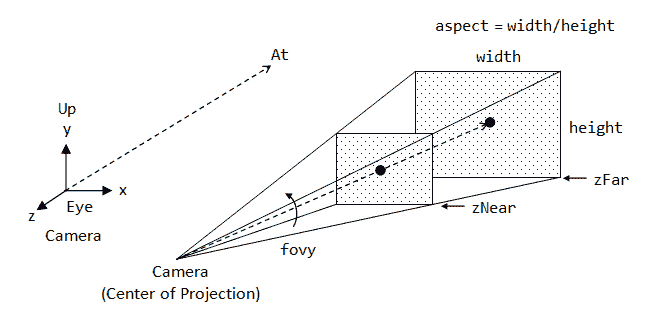
Use camera.perspective API to set the camera to a perspective camera:
| Parameter | Type | Description | Example |
|---|---|---|---|
| fov | number | The perspective degree | 60 |
| aspect | number | The aspect ratio of the viewport | window.innerWidth / window.innerHeight |
| near | number | The z value of the near clipping plane of the viewing frustum | 0.1 |
| far | number | The z value of the far clipping plane of the viewing frustum | 1000 |
import { Engine3D, Scene3D, AtmosphericComponent, HoverCameraController, Object3D, MeshRenderer, BoxGeometry, LitMaterial, DirectLight, View3D, Camera3D, Frustum, OrbitController, Vector3, Color, AxisObject, GridObject } from "@orillusion/core";
import * as dat from "dat.gui"
// initializa engine
await Engine3D.init();
// create new scene as root node
let scene3D: Scene3D = new Scene3D();
// add an Atmospheric sky enviroment
let sky = scene3D.addComponent(AtmosphericComponent);
sky.sunY = 0.6;
// create camera
let cameraObj: Object3D = new Object3D();
let camera = cameraObj.addComponent(Camera3D);
// adjust camera view
camera.perspective(45, Engine3D.aspect, 0.1, 1000.0);
camera.lookAt(new Vector3(0, 10, 10), Vector3.ZERO, Vector3.UP)
// set camera controller
let controller = cameraObj.addComponent(OrbitController);
controller.maxDistance = 200;
// add camera node
scene3D.addChild(cameraObj);
// create light obj
let light: Object3D = new Object3D();
// adjust light rotation
light.rotationX = 45;
light.rotationY = 30;
// add direct light component
let dirLight: DirectLight = light.addComponent(DirectLight);
dirLight.intensity = 3;
// add light object to scene
scene3D.addChild(light);
Camera Conponent
The Camera component provides flexible extension support for the camera, which can be used directly with predefined components, or can be customized to implement more personalized requirements. The component executes its own update logic in sync with the Engine3D main loop through its update function.
FlyCamera
This controller implements the camera's free movement. Its interaction features are:
- Move forward, backward and left and right by pressing W A S D
- Control the movement direction of the camera by holding down the left mouse button
import { Engine3D, Scene3D, Object3D, Camera3D, Vector3, PlaneGeometry, DirectLight, Color, KelvinUtil, FlyCameraController, AtmosphericComponent, LitMaterial, BoxGeometry, MeshRenderer, View3D } from '@orillusion/core';

await Engine3D.init();
let scene: Scene3D = new Scene3D();
let cameraObj = new Object3D();
cameraObj.y = 0;
let camera = cameraObj.addComponent(Camera3D);
camera.perspective(60, Engine3D.aspect, 0.1, 5000.0);

// add Camera Controller
let flyController = cameraObj.addComponent(FlyCameraController);
flyController.setCamera(new Vector3(0, 15, 15), new Vector3(0, 10, 0));
flyController.moveSpeed = 10;
scene.addChild(cameraObj);

const boxObj: Object3D = new Object3D();
boxObj.localPosition = new Vector3(0, 10, 0);
let boxMr: MeshRenderer = boxObj.addComponent(MeshRenderer);
boxMr.geometry = new BoxGeometry(2, 2, 2);
boxMr.material = new LitMaterial();
boxMr.material.baseColor = new Color(1.0, 1.0, 1.0, 1.0);
scene.addChild(boxObj);

let groundObj = new Object3D();
groundObj.localPosition = new Vector3(0, 9, 0);

let planeMr = groundObj.addComponent(MeshRenderer);
planeMr.geometry = new PlaneGeometry(10, 10);

planeMr.material = new LitMaterial();
scene.addChild(groundObj);

{
    let lightObj = new Object3D();
    lightObj.x = 0;
    lightObj.y = 0;
    lightObj.z = 0;
    lightObj.rotationX = 0;
    lightObj.rotationY = 0;
    lightObj.rotationZ = 0;
    let lc = lightObj.addComponent(DirectLight);
    lc.lightColor = KelvinUtil.color_temperature_to_rgb(5355);
    lc.castShadow = true;
    lc.intensity = 1.7;
    scene.addChild(lightObj);
}

// add an Atmospheric sky enviroment
scene.addComponent(AtmosphericComponent).sunY = 0.6;
// create a view with target scene and camera
let view = new View3D();
view.scene = scene;
view.camera = camera;
// start render
Engine3D.startRenderView(view);Basic usage:
import { Scene3D, Camera3D, FlyCameraController } from '@orillusion/core'
// Create a node
let cameraObj = new Object3D();
// Add a camera component to the node
let camera = cameraObj.addComponent(Camera3D);
// Add a controller component to the node
let flyController = cameraObj.addComponent(FlyCameraController);
// Set the camera position through the component setCamera
flyController.setCamera(new Vector3(0, 0, 15), new Vector3(0, 0, 0));
// Set the mouse movement speed
flyController.moveSpeed = 10;The fly camera can be set by setCamera to set its own position and orientation
| Parameter | Type | Description | Example |
|---|---|---|---|
| targetPos | Vector3 | The position of the camera | new Vector3(0,0,10) |
| lookAtPos | Vector3 | The position of the target | new Vector3(0,0,0) |
Also, you can modify moveSpeed to adjust the speed of movement
| Parameter | Type | Description | Example |
|---|---|---|---|
| moveSpeed | number | The speed of movement | 10 |
HoverCamera
This camera controller implements the camera's movement in the xz plane and rotation around the current observation point. Its interaction features are:
- Press the left mouse button and move the mouse to rotate the camera around the current observation target.
- Press the right mouse button and move the mouse to pan the camera in various directions in both
xzplane andydirection. - Scroll the mouse wheel to control the camera's viewing distance
import { Engine3D, Scene3D, Object3D, Camera3D, Vector3, HoverCameraController, AtmosphericComponent, LitMaterial, BoxGeometry, MeshRenderer, View3D, DirectLight } from '@orillusion/core';

await Engine3D.init();
let scene: Scene3D = new Scene3D();

let cameraObj = new Object3D();
let camera = cameraObj.addComponent(Camera3D);
camera.perspective(60, Engine3D.aspect, 0.1, 5000.0);

// add camera controller
let hoverController = cameraObj.addComponent(HoverCameraController);
hoverController.setCamera(15, -15, 15, new Vector3(0, 0, 0));
scene.addChild(cameraObj);

// add a base light
let lightObj = new Object3D();
lightObj.addComponent(DirectLight);
scene.addChild(lightObj);

const boxObj: Object3D = new Object3D();
boxObj.localPosition = new Vector3(0, 0, 0);

let mr: MeshRenderer = boxObj.addComponent(MeshRenderer);
mr.geometry = new BoxGeometry(5, 5, 5);
mr.material = new LitMaterial();

scene.addChild(boxObj);

// add an Atmospheric sky enviroment
scene.addComponent(AtmosphericComponent).sunY = 0.6;
// create a view with target scene and camera
let view = new View3D();
view.scene = scene;
view.camera = camera;
// start render
Engine3D.startRenderView(view);Basic usage:
import { Scene3D, Camera3D, HoverCameraController } from '@orillusion/core'
// Create a node
let cameraObj = new Object3D();
// Add a camera component to the node
let camera = cameraObj.addComponent(Camera3D);
// Add a controller component to the node
let hoverCameraController = cameraObj.addComponent(HoverCameraController);
// Set the camera position through the component setCamera
hoverController.setCamera(15, -15, 15, new Vector3(0, 0, 0));The hover camera can be controlled by setCamera to set its own position and orientation
| Parameter | Type | Description | Example |
|---|---|---|---|
| roll | number | Rotate around the y axis | 0 |
| pitch | number | Rotate around the x axis | 0 |
| distance | number | Distance from the target | 10 |
| target | Vector3 | Target coordinate | new Vector3(0,0,0) |
Orbit
This camera controller is similar to the hover camera, but it can directly set the position and orientation of the camera Object3D to control the position and orientation of the view. The main features are as follows:
- Press the left mouse button and move the mouse to rotate the camera around the current observation target.
- Press the right mouse button and move the mouse to move the camera smoothly in the direction and distance of the mouse movement in the current scene visible area.
- Scroll the mouse wheel to control the camera's viewing distance
- You can set the camera to automatically rotate
- You can set the rotation, zoom, and translation speed
- You can set the maximum and minimum angles of elevation
import { Engine3D, Scene3D, Object3D, Camera3D, Vector3, OrbitController, AtmosphericComponent, LitMaterial, BoxGeometry, MeshRenderer, View3D, DirectLight } from '@orillusion/core';
await Engine3D.init();
let scene: Scene3D = new Scene3D();
let cameraObj = new Object3D();
let camera = cameraObj.addComponent(Camera3D);
camera.perspective(60, Engine3D.aspect, 0.1, 5000.0);
cameraObj.localPosition.set(0, 10, 20);
// add camera controller
let orbit = cameraObj.addComponent(OrbitController);
// auto rotation
orbit.autoRotateSpeed = 0.5;
orbit.autoRotate = true;
scene.addChild(cameraObj);
Basic usage:
import { Scene3D, Camera3D, OrbitController } from '@orillusion/core'
// Create a node
let cameraObj = new Object3D();
// Add a camera component to the node
let camera = cameraObj.addComponent(Camera3D);
// Add a controller component to the node
let orbit = cameraObj.addComponent(OrbitController);
// Set the position of the camera Object3D
cameraObj.localPosition.set(0, 10, 30);
// Enable automatic rotation
orbit.autoRotate = true
// Automatic rotation speed
orbit.autoRotateSpeed = 0.1
// Zoom speed coefficient
orbit.zoomFactor = 0.1
// View angle translation speed coefficient
orbit.panFactor = 0.25
// View angle smoothing coefficient
orbit.smooth = 5
// Zoom minimum distance
orbit.minDistance = 1
// Zoom maximum distance
orbit.maxDistance = 1000
// Minimum elevation angle
orbit.minPolarAngle = -90
// Maximum elevation angle
orbit.minPolarAngle = 90Custom Controller
Users can extend additional camera components through custom components, See OrbitController as an example.